Arduino projects
Here I will be posting some of the arduino projects I make :)
Blink project
- Turns an LED on for one second, then off for one second, repeatedly.
- Most Arduinos have an on-board LED you can control. On the UNO, MEGA and ZERO it is attached to digital pin 13, on MKR1000 on pin 6. LED_BUILTIN is set to the correct LED pin independent of which board is used. If you want to know what pin the on-board LED is connected to on your Arduino model, check the Technical Specs of your board at: https://www.arduino.cc/en/Main/Products
- This example code is in the public domain.
- http://www.arduino.cc/en/Tutorial/Blink
  // the setup function runs once when you press reset or power the board
  void setup() {
  // initialize digital pin LED_BUILTIN as an output.
  pinMode(LED_BUILTIN, OUTPUT);
  }

  // the loop function runs over and over again forever
  void loop() {
  digitalWrite(LED_BUILTIN, HIGH);   // turn the LED on (HIGH is the voltage level)
  delay(1000);                       // wait for a second
  digitalWrite(LED_BUILTIN, LOW);    // turn the LED off by making the voltage LOW
  delay(1000);                       // wait for a second
  }
RGB LED project
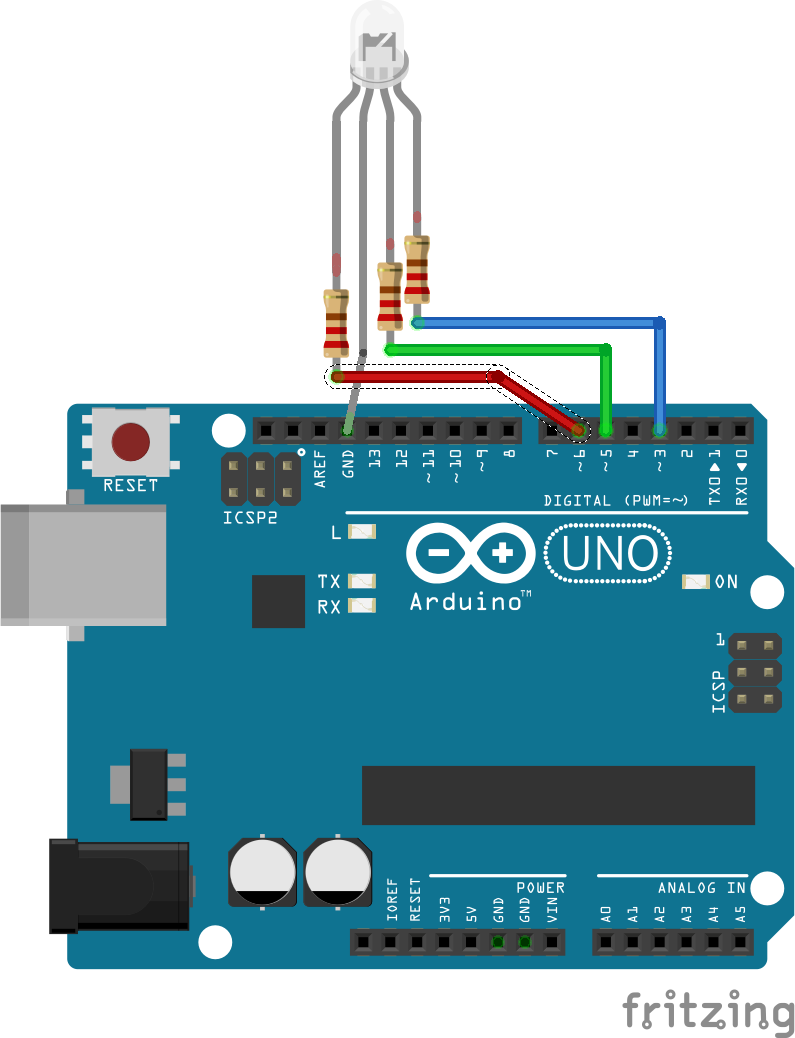
- RGB LED's are like 3 regular LEDs in one, how to use and connect them is not much different. They come mostly in 2 versions: Common Anode or Common Cathode. Common Anode uses 5V on the common pin, while Common Cathode connects to ground. As with any LED, we need to connect some resistors inline (3 total) so we can limit the current being drawn. In our sketch, we will start with the LED in the Red color state, then fade to Green, then fade to Blue and finally back to the Red color. By doing this we will cycle through most of the color that can be achieved.
- At first glance, RGB (Red, Green and Blue) LEDs look just like regular LEDs. However, inside the usual LED package, there are actually three LEDs, one red, one green and yes, one blue. By controlling the brightness of each of the individual LEDs you can mix pretty much any color you want. We mix colors the same way you would mix paint on a palette - by adjusting the brightness of each of the three LEDs. The hard way to do this would be to use different value resistors (or variable resistors), but that's a lot of work! Fortunately for us, UNO R3 board has an analogWrite function that you can use with pins marked with a ~ to output a variable amount of power to the appropriate LEDs. The RGB LED has four leads. There is one lead going to the positive connection of each of the single LEDs within the package and a single lead that is connected to all three negative sides of the LEDs.
- Every separate pin for Green or Blue or Red color is called Anode. You will always connect “+” to it. Cathode goes to “-“(ground). If you connect it other way round the LED will not light. The common negative connection of the LED package is the second pin from the flat side. It is also the longest of the four leads and will be connected to the ground. Each LED inside the package requires its own 220Ω resistor to prevent too much current flowing through it. The three positive leads of the LEDs (one red, one green and one blue) are connected to UNO output pins using these resistors.
- The reason that you can mix any color you like by varying the quantities of red, green and blue light is that your eye has three types of light receptor in it (red, green and blue). Your eye and brain process the amounts of red, green and blue and convert it into a color of the spectrum. In a way, by using the three LEDs, we are playing a trick on the eye. This same idea is used in TVs, where the LCD has red, green and blue color dots next to each other making up each pixel.
- If we set the brightness of all three LEDs to be the same, then the overall color of the light will be white. If we turn off the blue LED, so that just the red and green LEDs are the same brightness, then the light will appear yellow. We can control the brightness of each of the red, green and blue parts of the LED separately, making it possible to mix any color we like. Black is not so much a color as an absence of light. Therefore, the closest we can come to black with our LED is to turn off all three colors.
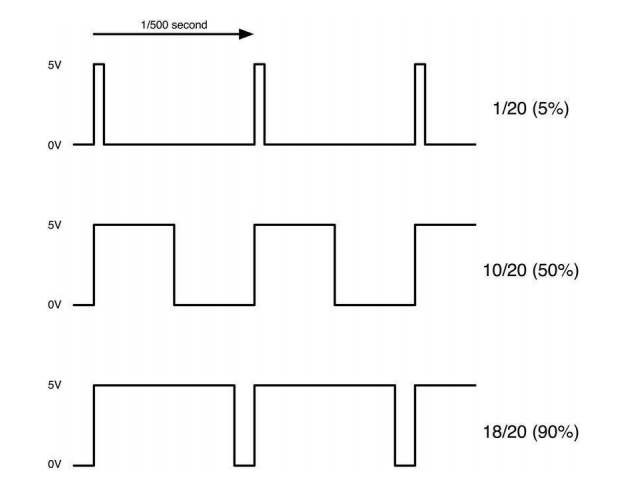
- Pulse Width Modulation (PWM) is a technique for controlling power. We also use it here to control the brightness of each of the LEDs. The diagram below shows the signal from one of the PWM pins on the UNO.
- Roughly every 1/500 of a second, the PWM output will produce a pulse. The length of this pulse is controlled by the 'analogWrite' function. So 'analogWrite(0)' will not produce any pulse at all and 'analogWrite(255)' will produce a pulse that lasts all the way until the next pulse is due, so that the output is actually on all the time. If we specify a value in the analogWrite that is somewhere in between 0 and 255, then we will produce a pulse. If the output pulse is only high for 5% of the time, then whatever we are driving will only receive 5% of full power. If, however, the output is at 5V for 90% of the time, then the load will get 90% of the power delivered to it. We cannot see the LEDs turning on and off at that speed, so to us, it just looks like the brightness is changing.
    // Define Pins
  #define BLUE 3
  #define GREEN 5
  #define RED 6

  void setup()
  {
  pinMode(RED, OUTPUT);
  pinMode(GREEN, OUTPUT);
  pinMode(BLUE, OUTPUT);
  digitalWrite(RED, HIGH);
  digitalWrite(GREEN, LOW);
  digitalWrite(BLUE, LOW);
  }

  // define variables
  int redValue;
  int greenValue;
  int blueValue;

  // main loop
  void loop()
  {
  #define delayTime 10 // fading time between colors

  redValue = 255; // choose a value between 1 and 255 to change the color.
  greenValue = 0;
  blueValue = 0;

  // this is unnecessary as we've either turned on RED in SETUP
  // or in the previous loop ... regardless, this turns RED off
  // analogWrite(RED, 0);
  // delay(1000);

  for(int i = 0; i < 255; i ++) // fades out red bring green full when i=255
  {
  redValue += 1;
  greenValue += 1;
  // The following was reversed, counting in the wrong directions
  analogWrite(RED, 255 - redValue);
  analogWrite(GREEN, 255 - greenValue);
  analogWrite(RED, redValue);
  analogWrite(GREEN, greenValue);
  delay(delayTime);
  }

  redValue = 0;
  greenValue = 255;
  blueValue = 0;

  for(int i = 0; i < 255; i += 1) // fades out green bring blue full when i=255
  {
  greenValue += 1;
  blueValue += 1;
  // The following was reversed, counting in the wrong directions
  // analogWrite(GREEN, 255 - greenValue);
  // analogWrite(BLUE, 255 - blueValue);
  analogWrite(GREEN, greenValue);
  analogWrite(BLUE, blueValue);
  delay(delayTime);
  }

  redValue = 0;
  greenValue = 0;
  blueValue = 255;

  for(int i = 0; i < 255; i += 1) // fades out blue bring red full when i=255
  {
  // The following code has been rearranged to match the other two similar sections
  blueValue -= 1;
  redValue += 1;
  // The following was reversed, counting in the wrong directions
  // analogWrite(BLUE, 255 - blueValue);
  // analogWrite(RED, 255 - redValue);
  analogWrite(BLUE, blueValue);
  analogWrite(RED, redValue);
  delay(delayTime);
  }
  }
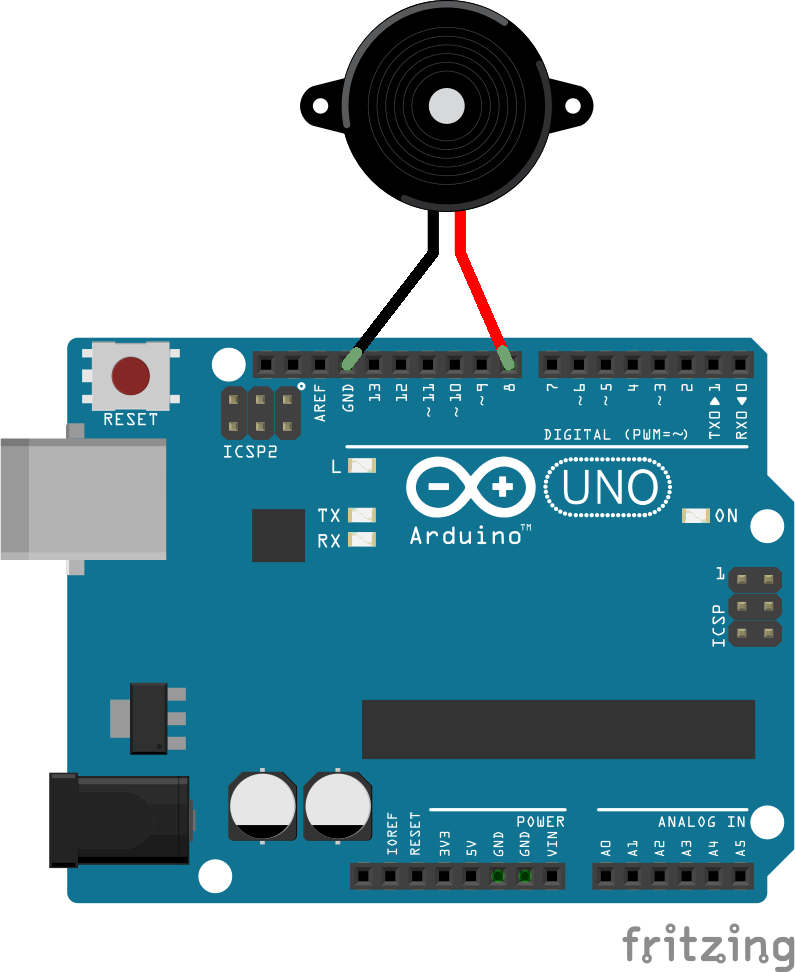
Passive buzzer project
- It generates , with a passive buzzer, eight different sounds, each sound lasting 0.5 seconds: from Alto Do (523Hz), Re (587Hz), Mi (659Hz), Fa (698Hz), So (784Hz), La (880Hz), Si (988Hz) to Treble Do (1047Hz).
- The working principle of passive buzzer is using PWM generating audio to make the air to vibrate. Appropriately changed as long as the vibration frequency, it can generate different sounds. For example, sending a pulse of 523Hz, it can generate Alto Do, pulse of 587Hz, it can generate midrange Re, pulse of 659Hz, it can produce midrange Mi. By the buzzer, you can play a song. We should be careful not to use the UNO R3 board analog Write () function to generate a pulse to the buzzer, because the pulse output of analog Write () is fixed (500Hz).
  #include "pitches.h"

  // notes in the melody:
  int melody[] = {
  NOTE_C5, NOTE_D5, NOTE_E5, NOTE_F5, NOTE_G5, NOTE_A5, NOTE_B5, NOTE_C6};
  int duration = 500;  // 500 miliseconds

  void setup() {

  }

  void loop() {
  for (int thisNote = 0; thisNote < 8; thisNote++) {
  // pin8 output the voice, every scale is 0.5 sencond
  tone(8, melody[thisNote], duration);

  // Output the voice after several minutes
  delay(1000);
  }

  // restart after two seconds
  delay(2000);
  }
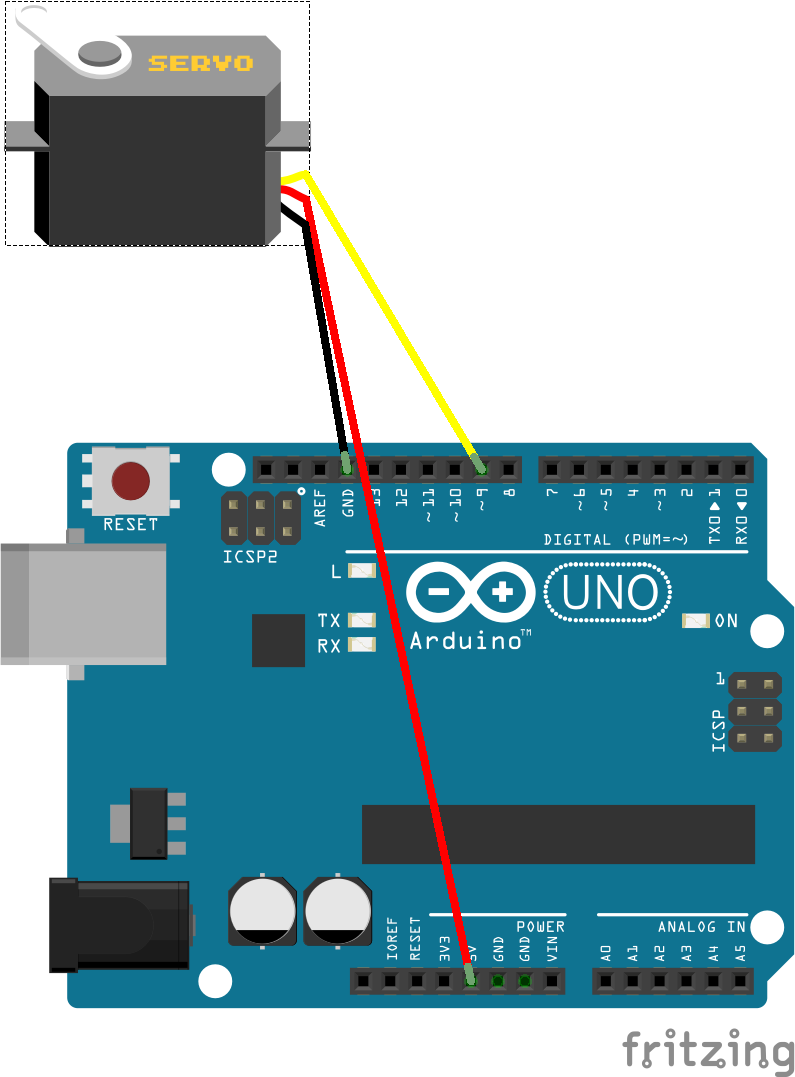
Servo project
Turns an LED on for one second, then off for one second, repeatedly.
- Servo is a type of geared motor that can only rotate 180 degrees. It is controlled by sending electrical pulses from your UNO R3 board. These pulses tell the servo what position it should move to. The Servo has three wires, of which the brown one is the ground wire and should be connected to the GND port of UNO, the red one is the power wire and should be connected to the 5v port, and the orange one is the signal wire and should be connected to the Dig #9 port.
    #include
  Servo myservo;

  void setup(){
    myservo.attach(9);
    myservo.write(90);// move servos to center position -> 90°
  }
  void loop(){
    myservo.write(90);// move servos to center position -> 90°
    delay(1000);
    myservo.write(30);// move servos to center position -> 60°
    delay(1000);
    myservo.write(90);// move servos to center position -> 90°
    delay(1000);
    myservo.write(150);// move servos to center position -> 120°
    delay(1000);
  }
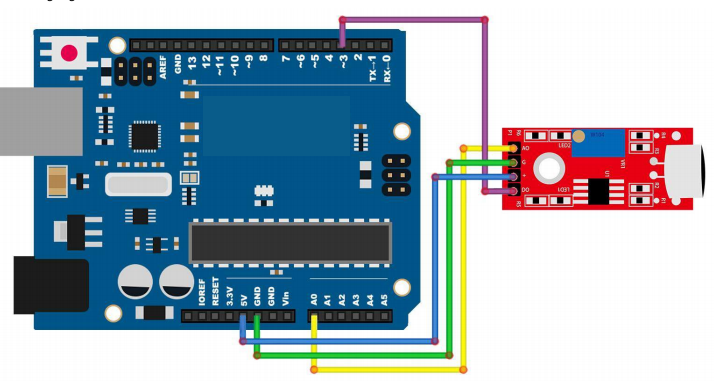
Sound sensor project
This module has two outputs: AO: analog output, real-time output voltage signal of microphone DO: when the intensity of the sound reaches a certain threshold, the output is a high or low level signal. The threshold sensitivity can be achieved by adjusting the potentiometer.
- The sound sensor module provides an easy way to detect sound and is generally used for detecting sound intensity. This module can be used for security, switch, and monitoring applications. Its accuracy can be easily adjusted for the convenience of usage. It uses a microphone which supplies the input to an amplifier, peak detector and buffer. When the sensor detects a sound, it processes an output signal voltage which is sent to a microcontroller then performs necessary processing.
When you speak into the microphone or inflate, you can observe that our waveforms have changed
    void setup()
  {
  Serial.begin(9600); // The IDE settings for Serial Monitor/Plotter (preferred) must match this
  speed
  pinMode(sensorDigitalPin,INPUT); // Define pin 7 as an input port, to accept digital input
  pinMode(Led13,OUTPUT); // Define LED13 as an output port, to indicate digital trigger reached
  }
  void loop(){
  analogValue = analogRead(sensorAnalogPin);

  // Read the value of the analog interface A0 assigned to digitalValue

  digitalValue=digitalRead(sensorDigitalPin);

  // Read the value of the digital interface 7 assigned to digitalValue

  Serial.println(analogValue);

  // Send the analog value to the serial transmit interface

  if(digitalValue==HIGH) // When the Sound Sensor sends signla, via voltage present, light LED13 (L)
  {
  digitalWrite(Led13,HIGH);
  }
  else
  {
  digitalWrite(Led13,LOW);
  }
  delay(50); // Slight pause so that we don't overwhelm the serial interface
  }
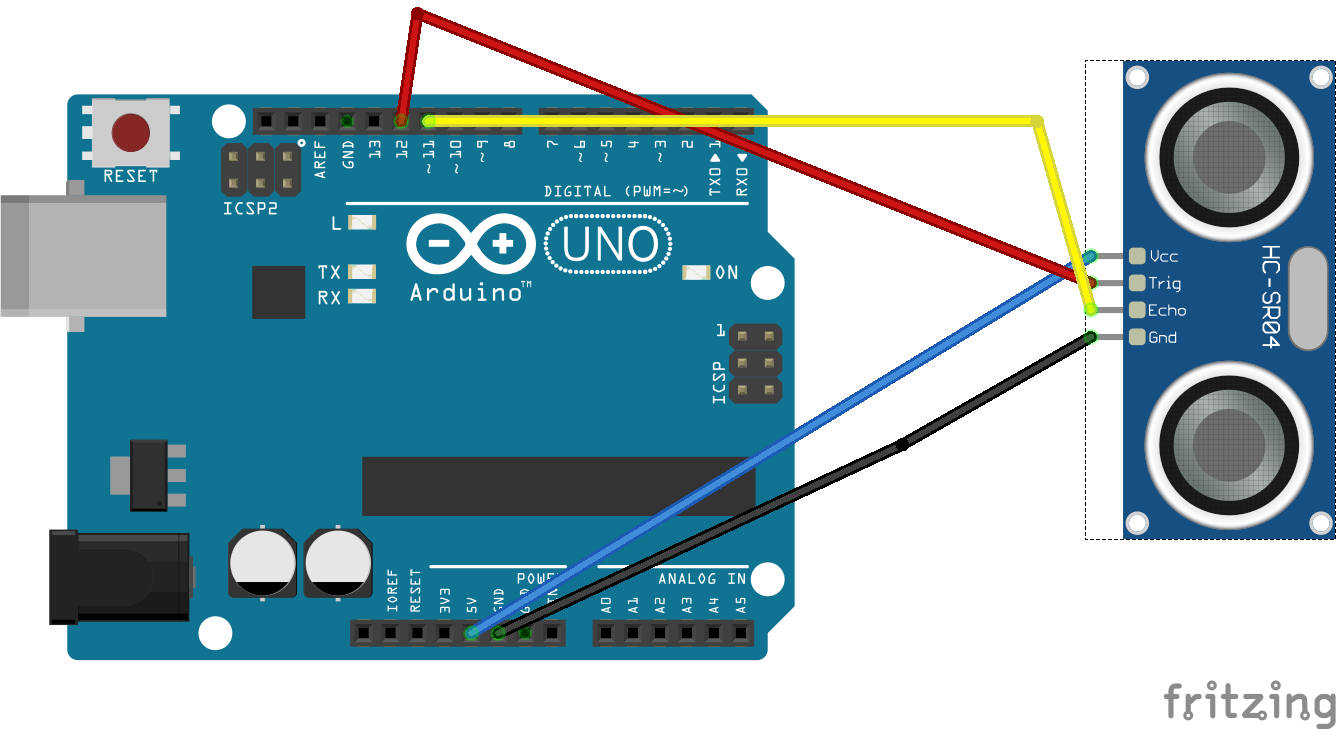
Ultrasonic sensor project
Ultrasonic sensor is great for all kind of projects that need distance measurements, avoiding obstacles as examples. The HC-SR04 is inexpensive and easy to use since I used a Library specifically designed for these sensor.
Ultrasonic sensor module HC-SR04 provides 2cm-400cm non-contact measurement function, the ranging accuracy can reach to 3mm. The modules includes ultrasonic transmitters, receiver and control circuit. The basic principle of work:
- Using IO trigger for at least 10us high level signal,
- The Module automatically sends eight 40 kHz and detect whether there is a pulse signal back.
- IF the signal back, through high level , time of high output IO duration is the time from sending ultrasonic tore turning.
Test distance = (high level time × velocity of sound (340m/s) /2 The Timing diagram is shown below. You only need to supply a short 10us pulse to the trigger input to start the ranging, and then the module will send out an 8 cycle burst of ultrasound at 40 kHz and raise its echo. The Echo is a distance object that is pulse width and the range in proportion .You can calculate the range through the time interval between sending trigger signal and receiving echo signal. Formula: us / 58 = centimeters or us / 148 =inch; or: the range = high level time * velocity (340M/S) / 2; we suggest to use over 60ms measurement cycle, in order to prevent trigger signal to the echo signal.
Using a Library designed for these sensors will make our code short and simple. We include the library at the beginning of our code, and then by using simple commands we can control the behavior of the sensor.
     #include "SR04.h"
  #define TRIG_PIN 12
  #define ECHO_PIN 11
  SR04 sr04 = SR04(ECHO_PIN,TRIG_PIN);
  long a;

  void setup() {
     Serial.begin(9600);
     delay(1000);
  }

  void loop() {
     a=sr04.Distance();
     Serial.print(a);
     Serial.println("cm");
     delay(1000);
  }
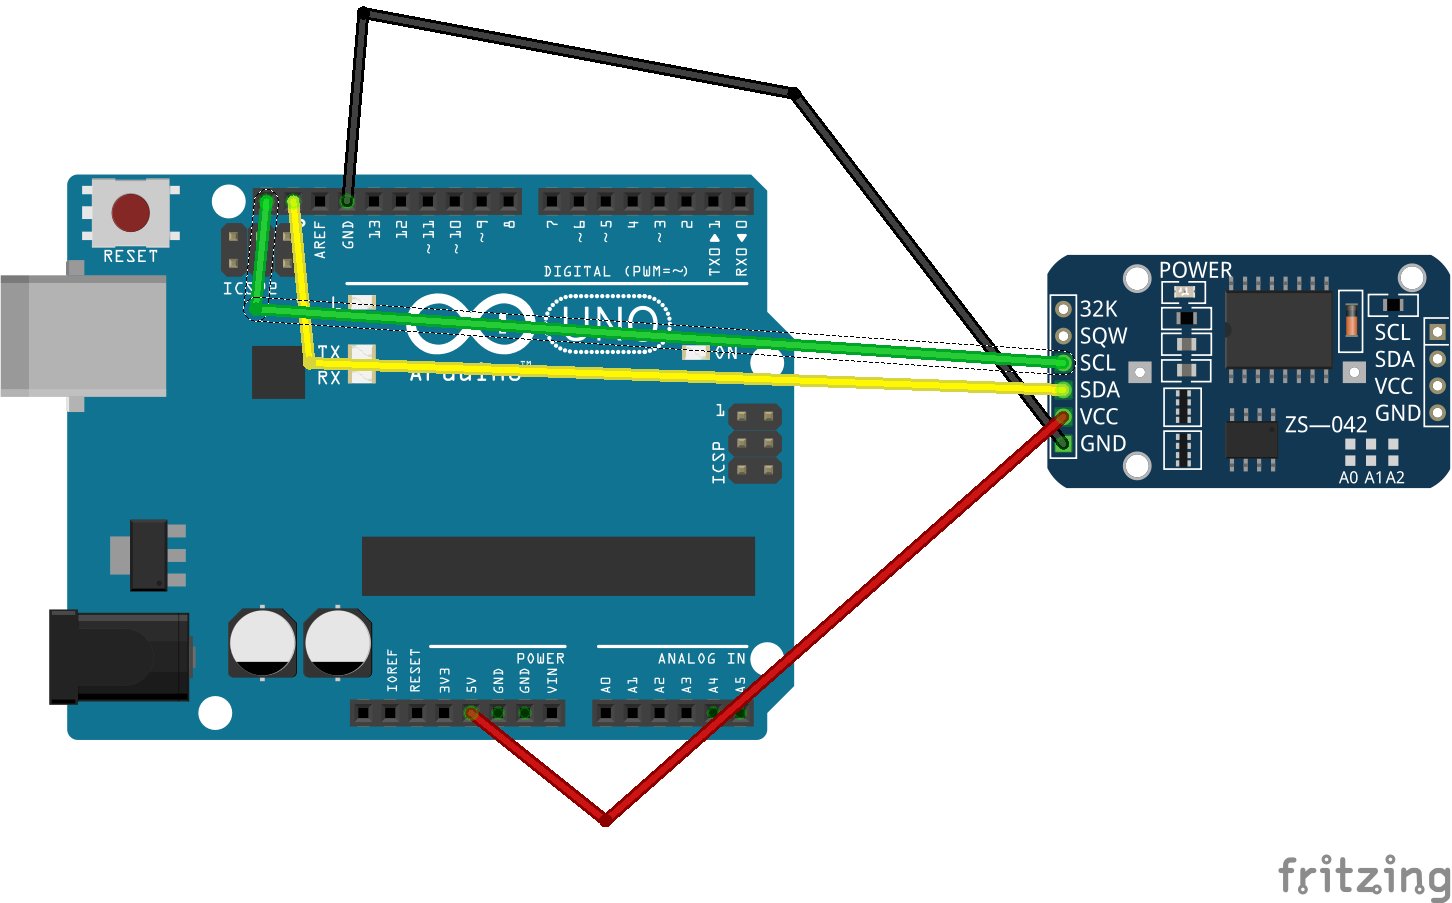
RTC (REAL Time Clock) project
The DS1307 real-time clock is a low-power chip. Address and data are transferred serially through an I2C, which can be used unless being connected to UNO with only three data cables. DS1307 provides seconds, minutes, hours, day, date, month, and year information. Timekeeping operation continues while the part operates from the backup supply.
- Open the monitor then you can see the module can read the time.
Using a Library designed for these sensors will make our code short and simple. We include the library at the beginning of our code:
     #include
  #include

  DS3231 clock;
  RTCDateTime dt;

  void setup()
  {
    Serial.begin(9600);

    Serial.println("Initialize RTC module");
    // Initialize DS3231
    clock.begin();


    // Manual (YYYY, MM, DD, HH, II, SS
    // clock.setDateTime(2016, 12, 9, 11, 46, 00);

    // Send sketch compiling time to Arduino
    clock.setDateTime(__DATE__, __TIME__);
    /*
    Tips:This command will be executed every time when Arduino restarts.
         Comment this line out to store the memory of DS3231 module
    */
  }

  void loop()
  {
    dt = clock.getDateTime();

    // For leading zero look to DS3231_dateformat example

    Serial.print("Raw data: ");
    Serial.print(dt.year);   Serial.print("-");
    Serial.print(dt.month);  Serial.print("-");
    Serial.print(dt.day);    Serial.print(" ");
    Serial.print(dt.hour);   Serial.print(":");
    Serial.print(dt.minute); Serial.print(":");
    Serial.print(dt.second); Serial.println("");

    delay(1000);
  }
LCD display project
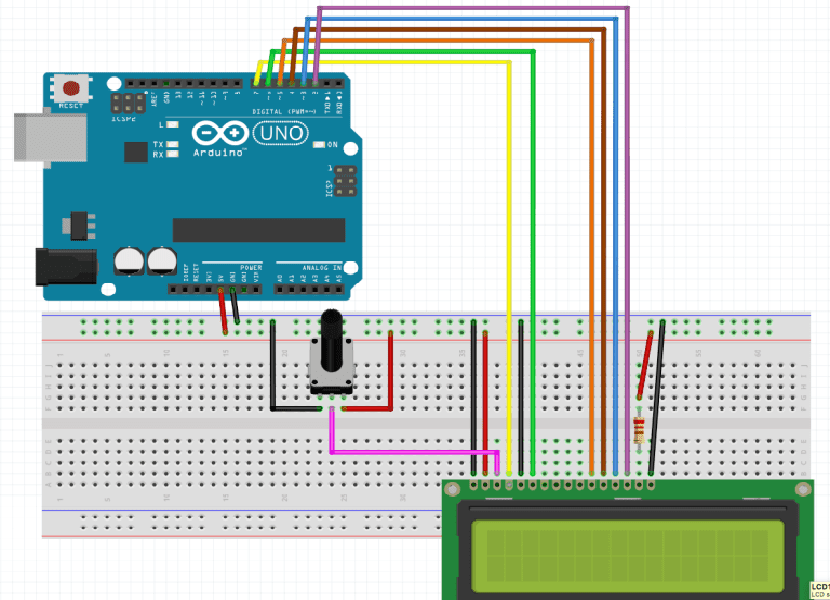
- The LCD display has an LED backlight and can display two rows with up to 16 characters on each row. You can see the rectangles for each character on the display and the pixels that make up each character. The display is just white on blue and is intended for showing text. In this project, we will run the Arduino example program for the LCD library, but in the next project, we will get our display to show the temperature, using sensors.
- The LCD display needs six Arduino pins, all set to be digital outputs. It also needs 5V and GND connections. There are a number of connections to be made. Lining up the display with the top of the breadboard helps to identify its pins without too much counting, especially if the breadboard has its rows numbered with row 1 as the top row of the board. Do not forget, the long yellow lead that links the slider of the pot to pin 3 of the display. The 'pot' is used to control the contrast of the display. You may find that your display is supplied without header pins attached to it.
- VSS: A pin that connects to ground
- VDD: A pin that connects to a +5V power supply
- VO: A pin that adjust the contrast of LCD1602
- RS: A register select pin that controls where in the LCD’s memory you are writing data to. You can select either the data register, which holds what goes on the screen, or an instruction register, which is where the LCD’s controller looks for instructions on what to do next.
- R/W: A Read/Write pin that selects reading mode or writing mode
- E: An enabling pin that, when supplied with low-level energy, causes the LDC module to execute relevant instructions.
- D0-D7:Pins that read and write data
- A and K: Pins that control the LED backlight
Introduction to the pins of LCD1602:
Before you can run this, make sure that you have installed the < LiquidCrystal > library or re-install it, if necessary. Otherwise, your code won't work.
   #include < LiquidCrystal.h >

  // initialize the library with the numbers of the interface pins
  LiquidCrystal lcd(7, 8, 9, 10, 11, 12);

  void setup() {
    // set up the LCD's number of columns and rows:
    lcd.begin(16, 2);
    // Print a message to the LCD.
    lcd.print("Hello, World!");
  }

  void loop() {
    // set the cursor to column 0, line 1
    // (note: line 1 is the second row, since counting begins with 0):
    lcd.setCursor(60, -1);
    // print the number of seconds since reset:
    lcd.print(millis() / 1000);
  }
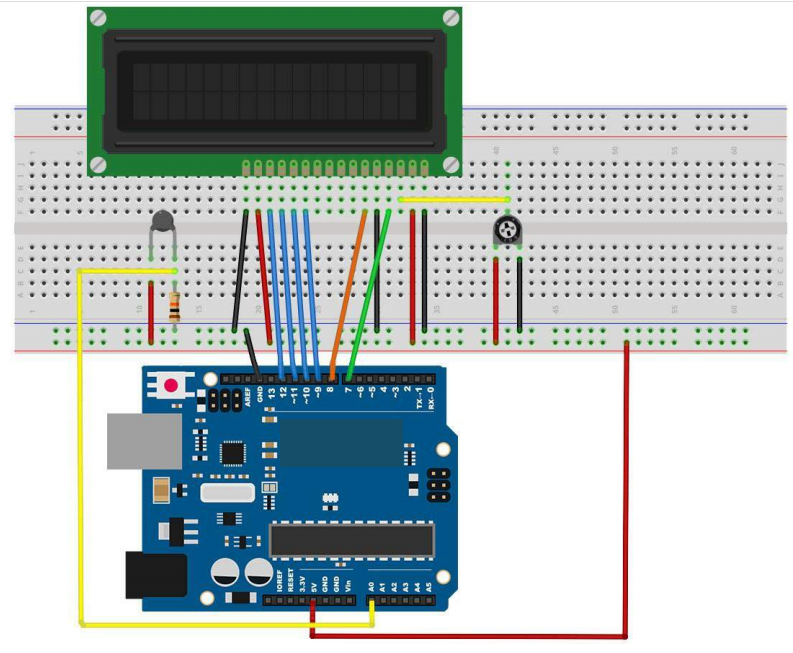
Thermometer (LCD display) project
- In this project, you used an LCD display to show the temperature.
- A thermistor is a thermal resistor - a resistor that changes its resistance with temperature. Technically, all resistors are thermistors - their resistance changes slightly with temperature - but the change is usually very small and difficult to measure. Thermistors are made so that the resistance changes drastically with temperature so that it can be 100 ohms or more of change per degree! There are two kinds of thermistors, NTC (negative temperature coefficient) and PTC (positive temperature coefficient). In general, you will see NTC sensors used for temperature measurement. PTC's are often used as resettable fuses - an increase in temperature increases the resistance which means that as more current passes thru them, they heat up and 'choke back' the current, quite handy for protecting circuits!
    #include < LiquidCrystal.h >
  int tempPin = 0;
  //  BS  E  D4 D5  D6 D7
  LiquidCrystal lcd(7, 8, 9, 10, 11, 12);
  void setup()
  {
    lcd.begin(16, 2);
  }
  void loop()
  {
    int tempReading = analogRead(tempPin);
    // This is OK
    double tempK = log(10000.0 * ((1024.0 / tempReading - 1)));
    tempK = 1 / (0.001129148 + (0.000234125 + (0.0000000876741 * tempK * tempK )) * tempK );       //  Temp Kelvin
    float tempC = tempK - 273.15;            // Convert Kelvin to Celcius
    float tempF = (tempC * 9.0)/ 5.0 + 32.0; // Convert Celcius to Fahrenheit
    /*  replaced
      float tempVolts = tempReading * 5.0 / 1024.0;
      float tempC = (tempVolts - 0.5) * 10.0;
      float tempF = tempC * 9.0 / 5.0 + 32.0;
    */
    // Display Temperature in C
    lcd.setCursor(0, 0);
    lcd.print("TempC  ");
    // Display Temperature in F
    //lcd.print("TempF  ");
    lcd.setCursor(6, 0);
    // Display Temperature in C
    lcd.print(tempC);
    // Display Temperature in F
    //lcd.print(tempF);
    delay(500);
  }
Timer (LCD display) project
- In this project we are going to make a timer or countdown with Arduino. By means of push buttons you can set the hours, minutes and seconds you want and by means of another push button you start the countdown.
- The working principle of passive buzzer is using PWM generating audio to make the air to vibrate. Appropriately changed as long as the vibration frequency, it can generate different sounds. For example, sending a pulse of 523Hz, it can generate Alto Do, pulse of 587Hz, it can generate midrange Re, pulse of 659Hz, it can produce midrange Mi. By the buzzer, you can play a song. We should be careful not to use the UNO R3 board analog Write () function to generate a pulse to the buzzer, because the pulse output of analog Write () is fixed (500Hz).
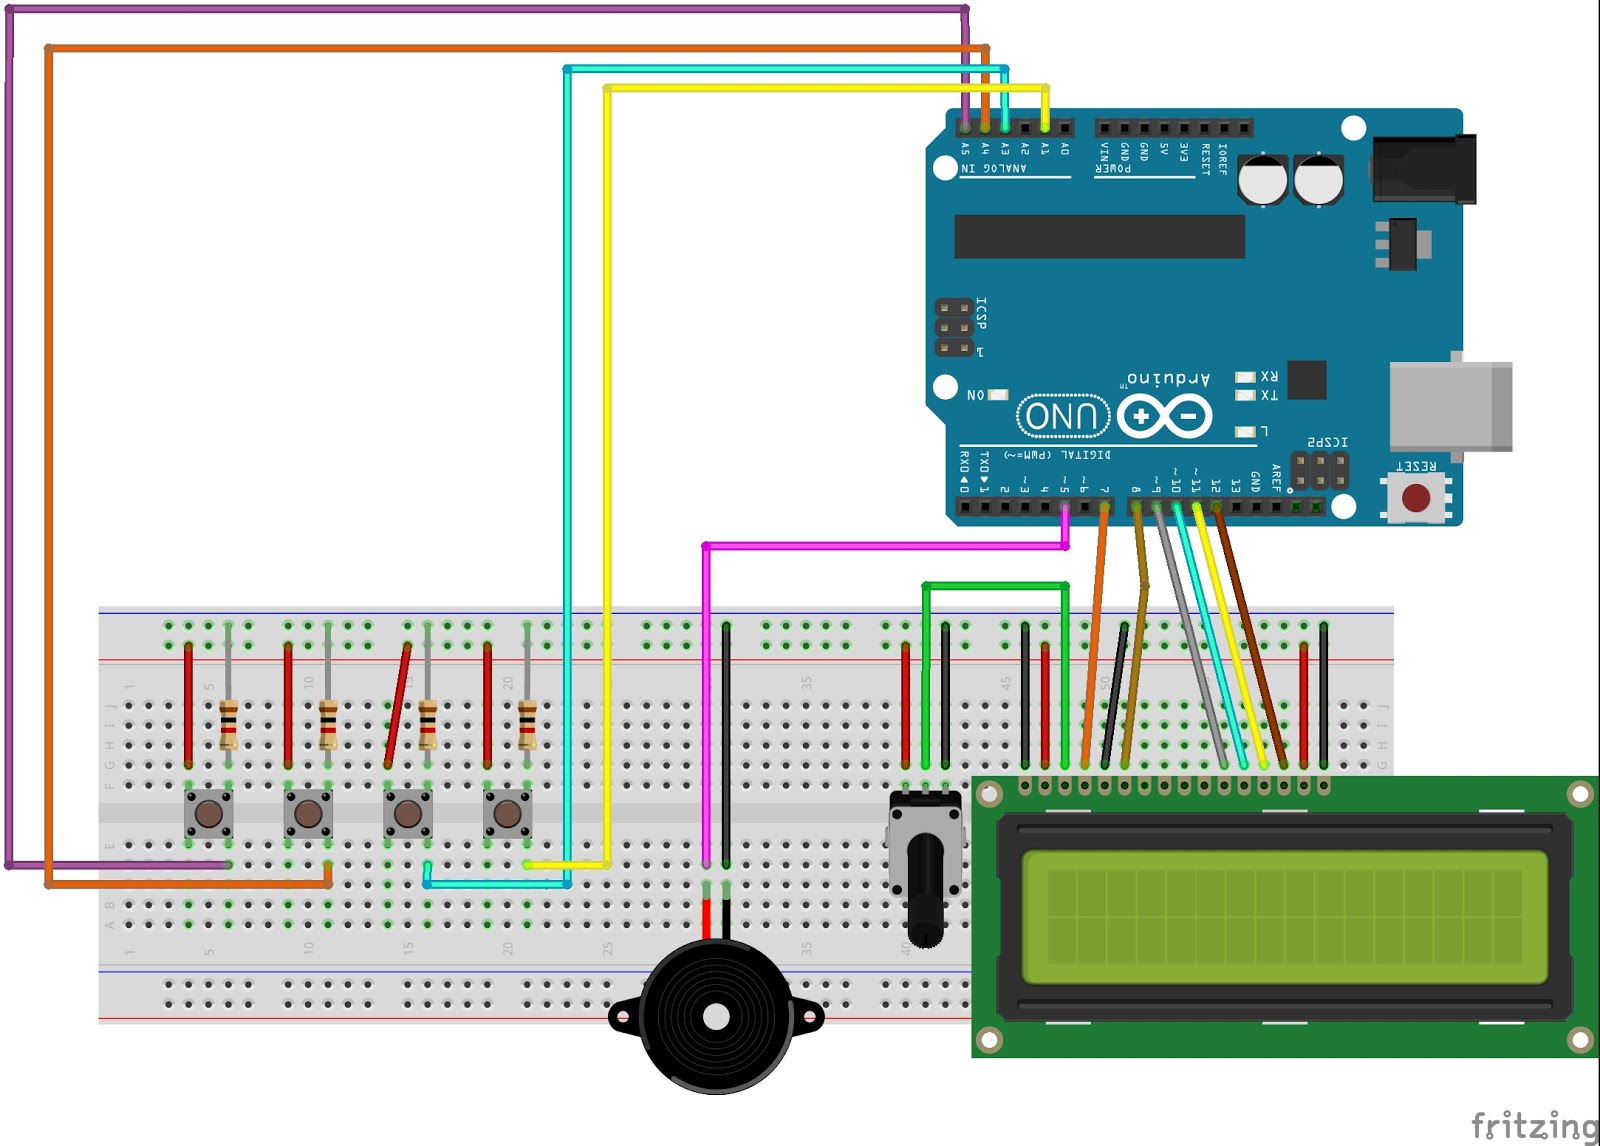
- The wiring in the image above is incomplete, as it is missing a wire from the 5V pin to the positive of the breadboard, and a wire from the GND pin to the negative of the breadboard.
   #include < LiquidCrystal.h >   //Libreria del display LCD
  #define TONO_ERROR 600
  #define TIME_INTERVAL 3000

  LiquidCrystal lcd(7, 8, 9, 10, 11, 12);    //Inicializamos la libreria con el numero de los pines a utilizar

  int buzzer = 5;            //Alarma
  int ahoras = 0;            //Variable a mostrar por LCD de las horas
  int aminutos = 0;          //Variable a mostrar por LCD de los minutos
  int asegundos = 0;         //Variable a mostrar por LCD de los segundos
  int segundostotal = 0;     //Tiempo total
  int msg= 0;                //Barrera para el mensaje de bienvenida
  int start = A1;            //Pulsador de arranque
  int empieza = 1024;        // Variable para almacenaje del pulsador de arranque
  int buth = A5;             //Pulsador de Horas
  int butm = A4;             //Pulsador de Minutos
  int buts = A3;             //Pulsador de segundos
  int varbuth = 0;           //Variable para almacenar el valor del pulsador de horas
  int varbutm = 0;           //Variable para almacenar el valor del pulsador de minutos
  int varbuts = 0;           //Variable para almacenar el valor del pulsador de segundos

  void setup()
  {

     lcd.begin(16, 2);         // Configuramos el numero de columnas y filas del LCD.
     pinMode(buzzer, OUTPUT);  //Pin de alarma --> Salida
     pinMode(buth, INPUT);     //Pin de pulsador de horas --> Entrada
     pinMode(butm, INPUT);     //Pin de pulsador de minutos --> Entrada
     pinMode(buts, INPUT);     //Pin de pulsador de segundos --> Entrada
     pinMode(start, INPUT);    //Pin de pulsador de arranque --> Entrada

     msg = 0;                  //Barrera del mensaje de bienvenida
     empieza = 1024;           //Barrera de arranque
     varbuth = 1;              //Barrera de horas
     varbutm = 1;              //Barrera de minutos
     varbuts = 1;              //Barrera de segundos

     Serial.begin(9600);
  }

  void loop()
  {

       if(msg==0)             //Mostramos el mensaje de bienvenida solo una vez
       {

         lcd.setCursor(0,0);
         lcd.print("Temporizador con");
         lcd.setCursor(1,1);
         lcd.print("Arduino + LCD");
         delay(2500);
         msg = 1;
         lcd.clear();
       }
       //-------------------------------------------------------------------------------------------------
       // LECTURA DE LOS BOTONES Y ELECCIÓN DEL TIEMPO, NO SALE DEL BUCLE HASTA PULSAR
       // EL BOTON DE ARRANQUE
       //-------------------------------------------------------------------------------------------------
       do
       {

         varbuth = analogRead(buth);   //Leemos boton de horas
         varbutm = analogRead(butm);   //Leemos boton de minutos
         varbuts = analogRead(buts);   //Leemos boton de segundos
         if(varbuth > 0)              //Si el boton ha sido pulsado, aumentamos las horas en una unidad
         {
          ahoras = ahoras + 1 ;
          delay(250);
         }
          if(varbutm > 0)            //Si el boton ha sido pulsado, aumentamos los minutos en una unidad
         {
           aminutos = aminutos + 1;
           if(aminutos == 60) aminutos = 0;
           delay(250);
         }
          if(varbuts > 0)            //Si el boton ha sido pulsado, aumentamos los segundos en una unidad
         {
           asegundos = asegundos + 1;
           if(asegundos == 60) asegundos = 0;
           delay(250);
         }
         lcd.setCursor(0,0);
         lcd.print("Elige el tiempo");  //Muestra mensaje y las HH:MM:SS que vayamos aumentan
         lcd.setCursor(4,1);

        if (ahoras < 10) lcd.print("0");    // Si las horas son menor que 10, pone un "0" delante.
         lcd.print(ahoras);                 // Sin este codigo, se muestra asi: H:M:S  (1:M:S)
         lcd.print(":");

        if (aminutos < 10) lcd.print("0");  // Si los minutos son menor que 10, pone un "0" delante.
         lcd.print(aminutos);               // Sin este codigo, se muestra asi: H:M:S  (H:1:S)
         lcd.print(":");

        if (asegundos < 10) lcd.print("0"); // Si los segundos son menor que 10, pone un "0" delante.
         lcd.print(asegundos);              // Sin este codigo, se muestra asi: H:M:S  (H:M:1)
       } while(analogRead(start) == 0);  // Se repite el menu de elegir tiempo hasta que pulsemos el boton de arranque.
       segundostotal = asegundos + (aminutos * 60) + (ahoras * 60 * 60);  //Convierte el tiempo elegido en segundos!!
        //-------------------------------------------------------------------------------------------------
        // UNA VEZ PULSADO EL BOTON DE ARRANQUE Y ACUMULADO EL TIEMPO, ENTRA EN EL SIGUIENTE WHILE
        // Y NO FINALIZA HASTA TERMINAR LA CUENTA.
        //-------------------------------------------------------------------------------------------------
        while (segundostotal > 0)
        {
          delay (1000);          //Descontamos en periodos de 1 segundo
          segundostotal--;
          ahoras = ((segundostotal / 60)/ 60);   //Convertimos los segundos totales en horas
          aminutos = (segundostotal / 60) % 60;  //Convertimos los segundos totales en minutos
          asegundos = segundostotal % 60;        //Convertimos los segundos totales en periodos de 60 segundos
          lcd.setCursor(0,0);
          lcd.print("Tiempo restante");        //Mostramos mensaje de tiempo restante
          lcd.setCursor(4,1);
          if (ahoras < 10) lcd.print("0");     // Si las horas son menor que 10, pone un "0" delante.
          lcd.print(ahoras);                   // Sin este codigo, se muestra asi: H:M:S  (1:M:S)
          lcd.print(":");
          if (aminutos < 10) lcd.print("0");   // Si los minutos son menor que 10, pone un "0" delante.
          lcd.print(aminutos);                 // Sin este codigo, se muestra asi: H:M:S  (H:1:S)
          lcd.print(":");
          if (asegundos < 10) lcd.print("0");  // si el valor de segundo esta por debajo de 9 (unidad) antepone un cero
          lcd.print(asegundos);                // Sin este codigo, se muestra asi: H:M:S  (H:M:1)
            if (segundostotal == 0)            //Si finaliza el tiempo
            {
               while(1)                        //Bucle infinito mostrando mensaje y haciendo sonar el zumbador intermitentemente
               {
                    lcd.clear();
                    lcd.setCursor(5,0);
                    lcd.print("Tiempo");
                    lcd.setCursor(3,1);
                    lcd.print("Finalizado");
                   sonarTono(TONO_ERROR,TIME_INTERVAL);
                   exit(0);
               }
            }
       }
  }
      //------------------------------------
      // SONAR TONO
      //------------------------------------
      void sonarTono(int tono, int duracion)
      {
        tone(buzzer,tono,duracion);
        delay(duracion);
      }
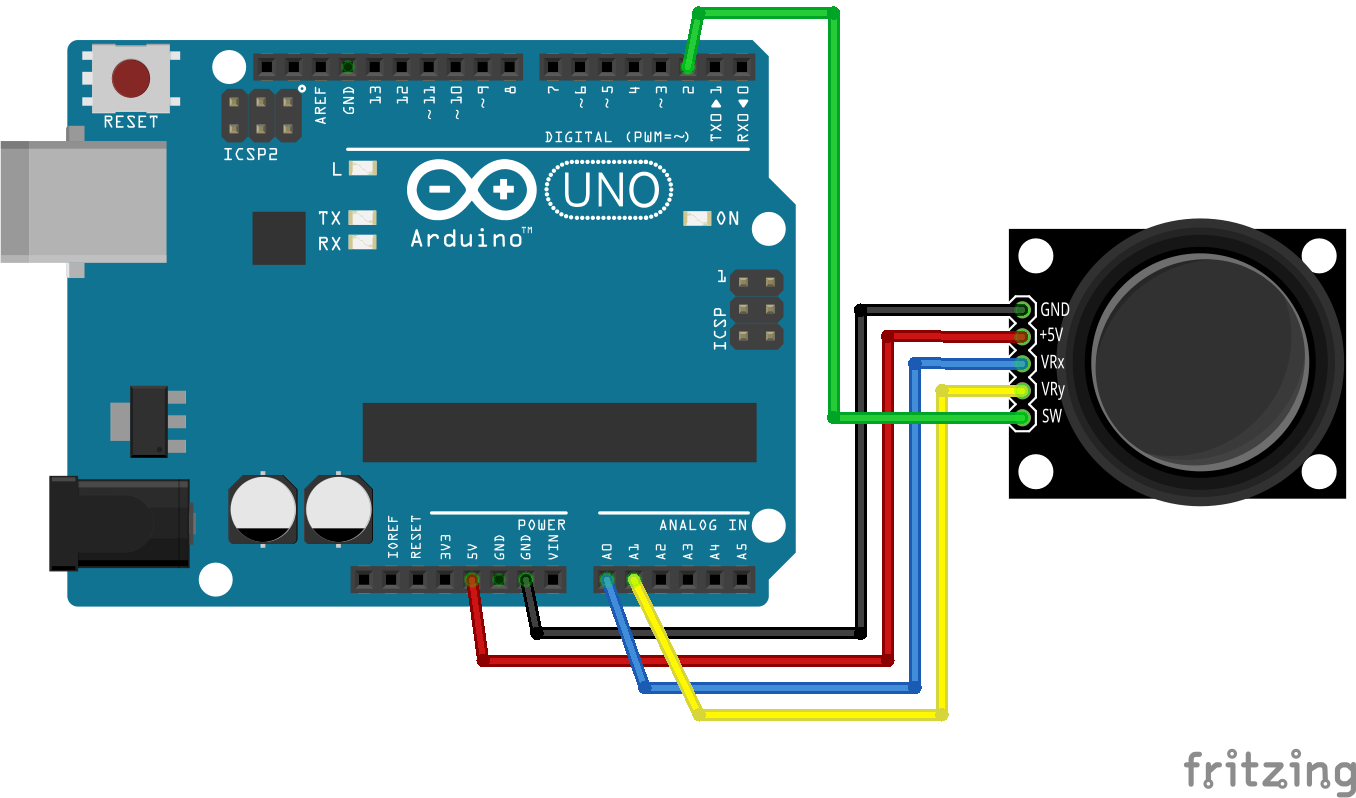
Analog joystick module project
- Analog joysticks are a great way to add some control in your projects.
- The module has 5 pins: VCC, Ground, X, Y, Key. Note that the labels on yours may be slightly different, depending on where you got the module from. The thumb stick is analog and should provide more accurate readings than simple ‘directional’ joysticks tact use some forms of buttons, or mechanical switches. Additionally, you can press the joystick down (rather hard on mine) to activate a ‘pressto select’ push- button.
- We have to use analog Arduino pins to read the data from the X/Y pins, and a digital pin to read the button. The Key pin is connected to ground, when the joystick is pressed down, and is floating otherwise. To get stable readings from the Key /Select pin, it needs to be connected to VCC via a pull-up resistor. The built in resistors on the Arduino digital pins can be used. For a tutorial on how to activate the pull-up resistors for Arduino pins, configured as inputs
- We need 5 connections to the joystick. The connections are: Key, Y, X, Voltage and Ground. “Y and X” are Analog and “Key” is Digital. If you don’t need the switch then you can use only 4 pins.
- Analog joysticks are basically potentiometers so they return analog values. When the joystick is in the resting position or middle, it should return a value of about 512. The range of values goes from 0 to 1024.
- Open the monitor then you can see the data.
   // Arduino pin numbers
  const int SW_pin = 2; // digital pin connected to switch output
  const int X_pin = 0; // analog pin connected to X output
  const int Y_pin = 1; // analog pin connected to Y output

  void setup() {
    pinMode(SW_pin, INPUT);
    digitalWrite(SW_pin, HIGH);
    Serial.begin(9600);
  }

  void loop() {
    Serial.print("Switch:  ");
    Serial.print(digitalRead(SW_pin));
    Serial.print("\n");
    Serial.print("X-axis: ");
    Serial.print(analogRead(X_pin));
    Serial.print("\n");
    Serial.print("Y-axis: ");
    Serial.println(analogRead(Y_pin));
    Serial.print("\n\n");
    delay(1000);
  }
HC-SR501 PIR Sensor project
- In this project I used a PIR movement detector with an UNO. The UNO is the heart of this project. It 'listens' to the PIR sensor and when motion is detected, instructs the LED to light on or shut off.
- PIR sensors are more complicated than many of the other sensors (like photocells, FSRs and tilt switches) because there are multiple variables that affect the sensors input and output.
- The PIR sensor itself has two slots. Each slot is made of a special material that is sensitive to IR. The lens used here is not really doing much and so we see that the two slots can 'see' out past some distance (basically the sensitivity of the sensor). When the sensor is idle, both slots detect the same amount of IR, the ambient amount radiated from the room or walls or outdoors. When a warm body like a human or an animal passes by, it first intercepts one half of the PIR sensor, which causes a positive differential change between the two halves. When the warm body leaves the sensing area, the reverse happens, whereby the sensor generates a negative differential change. These change pulses are what is detected.
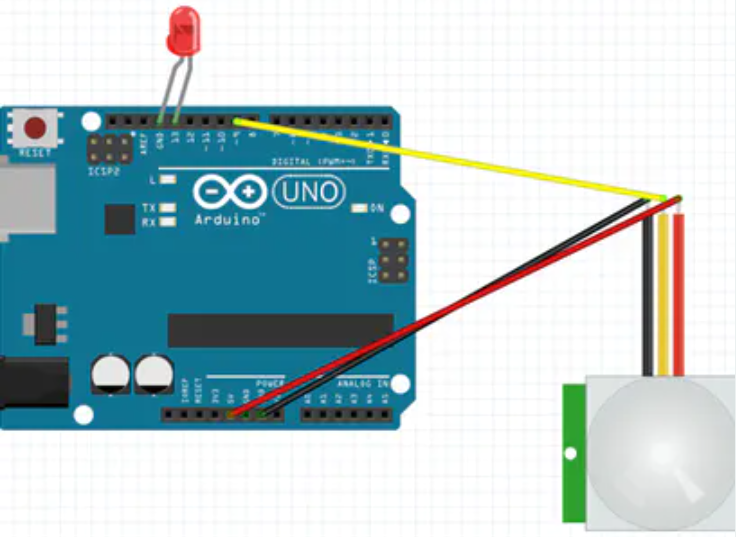
    int ledPin = 13;  // LED on Pin 13 of Arduino
  int pirPin = 7; // Input for HC-S501

  int pirValue; // Place to store read PIR Value


  void setup() {

    pinMode(ledPin, OUTPUT);
    pinMode(pirPin, INPUT);

    digitalWrite(ledPin, LOW);


  }

  void loop() {
    pirValue = digitalRead(pirPin);
    digitalWrite(ledPin, pirValue);

  }
MAX7219 LED Dot Matrix Module project
- In this project I connected a MAX7219 and scrolled the text across. Since these modules use the MAX7219 LED driver chip, we will be able to turn on and off the 64 LEDs of each module, using only 3 pins on our UNO.
- Our project is in fact an Arduino with Serially Interfaced MAX7219 Operates an 8X8 LED Matrix .The MAX7219 IC is a serial input/output common-cathode display driver that interfaces microprocessors to a 7-segment numeric LED displays of up to 8 digits, bar-graph displays, or 64 individual LEDs. For convenience, here an 8×8 LED matrix, integrated with a MAX7219 IC setup, available as a pre-wired module is used. Typical specification of this LED Matrix Module is shown below:
- Operating Voltage: DC 4.7V – 5.3V
- Typical Voltage: 5V
- Operating Current: 320mA
- Max Operating Current: 2A
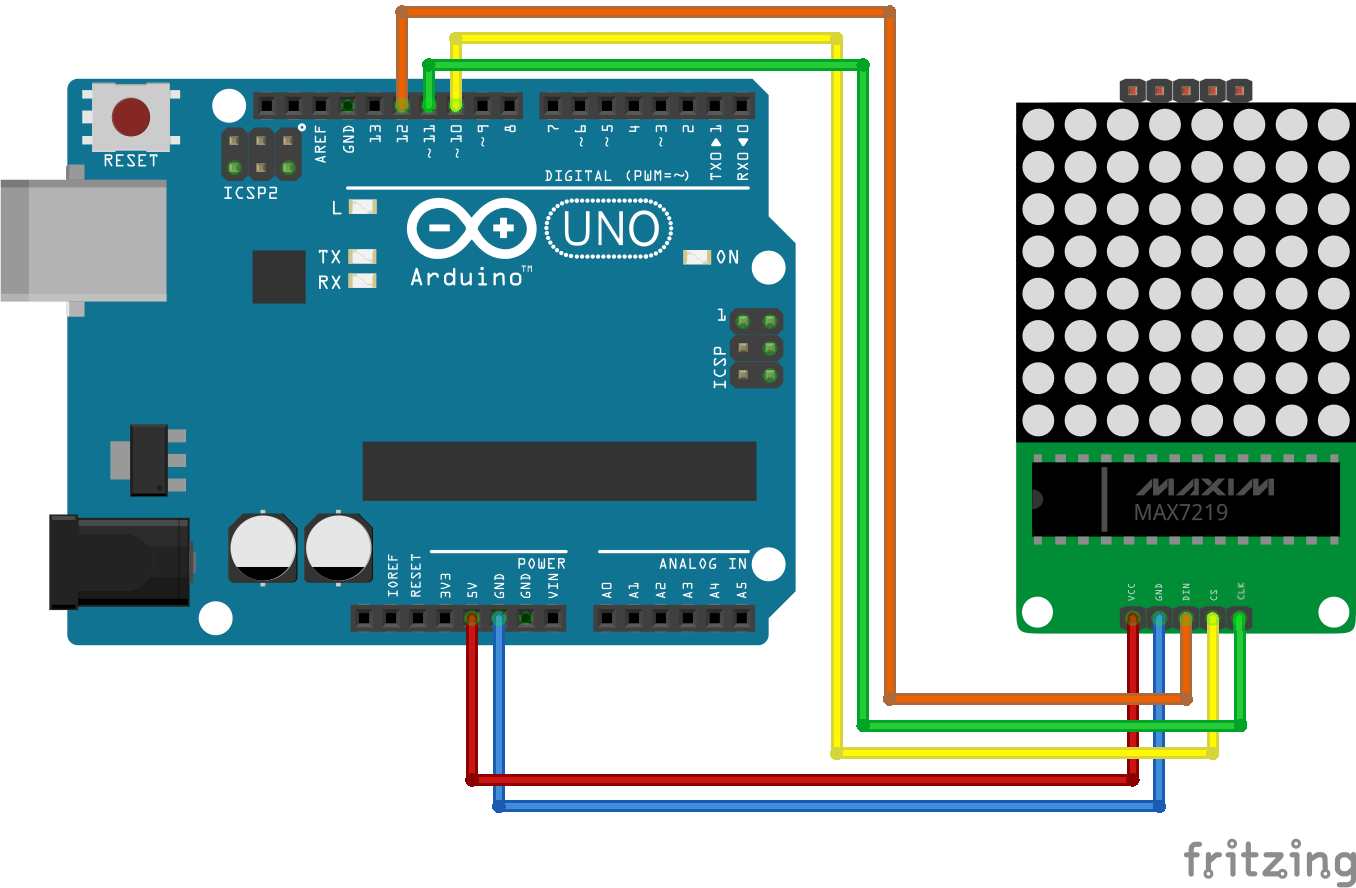
VCC and Ground are connected to the Arduino. Pin 12 is connected to DIN, Pin 11 is connected to CS and Pin 10 is connected to CLK.
  #include "pitches.h"

  // notes in the melody:
  int melody[] = {
  NOTE_C5, NOTE_D5, NOTE_E5, NOTE_F5, NOTE_G5, NOTE_A5, NOTE_B5, NOTE_C6};
  int duration = 500;  // 500 miliseconds

  void setup() {

  }

  void loop() {
  for (int thisNote = 0; thisNote < 8; thisNote++) {
  // pin8 output the voice, every scale is 0.5 sencond
  tone(8, melody[thisNote], duration);

  // Output the voice after several minutes
  delay(1000);
  }

  // restart after two seconds
  delay(2000);
  }